Crown XLS 1002 เพาเวอร์แอมป์
Crown XLS 1002: ข้อมูลเชิงลึกและการใช้งาน
Crown XLS 1002 เป็นเพาเวอร์แอมป์ในตระกูล XLS DriveCore 2 Series ซึ่งได้รับความนิยมมากในด้านความคุ้มค่า ประสิท...
| ราคา 17,900 บาท |
ดิจิตอล ออดิโอ 086 333 4125
Audio Systems ระบบเสียง

| ราคา 17,900 บาท |

| ราคา 21,900 บาท |

| ราคา 23,900 บาท |

| ราคา 26,900 บาท |
Crown XLS DriveCore™ 2 Series แอมป์ปริไฟเออร์สายพันธุ์ใหม่จาก Crown ด้วยการเปลี่ยนแปลงรูปลักษณ์ใหม่ ให้ดูโฉบเฉี่ยว ดีไซน์ทันสมัยยิ่งขึ้น มีหน้าจอ LCD ขนาดใหญ่สามารถทำให้มองเห็นได้ชัดเจน มาพร้อมกับภาค DSP (Digital Signal Processor) ติดตั้งมาภายใน กับ Band-Pass Filters ที่สามารถแบ่งภาคความถี่สำหรับขับ Sub และ Mid-Hi ได้อิสระแต่ละแชลแนล

XLS DriveCoreTM 2 แอมป์ปริไฟเออร์สายพันธุ์ใหม่จาก Crown
ด้วยการเปลี่ยนแปลงรูปลักษณ์ใหม่ ให้ดูโฉบเฉี่ยว ดีไซน์ทันสมัยยิ่งขึ้น
มีหน้าจอ LCD ขนาดใหญ่สามารถทำให้มองเห็นได้ชัดเจน มาพร้อม
กับภาค DSP (Digital Signal Processor) ติดตั้งมาภายใน กับ
Band-Pass Filters ที่สามารถแบ่งภาคความถี่สำหรับขับ Sub และ
Mid-Hi ได้อิสระแต่ละแชลแนล
XLS DriveCoreTM 2 เป็น Amplifier Class D ที่มีประสิทธิภาพสูง
ด้วยเทคโนโลยี DriveCoreTM ลิขสิทธิ์เฉพาะของ Crown ให้กำลัง
ขับสูงถึง 2400W ที่ 4 Ω Bridge ให้เสียงเคลียร์ สะอาดหมดจด มี
Headroom ที่เพียงพอต่อการใช้งาน นอกจากนี้ยังสามารถเลือกค่า
ความไว (Sensitivity) ได้ 1.4Vrms และ 0.775Vrms เพื่อให้เหมาะ
กับระดับความแรงของสัญญาณ Input ขณะใช้งาน สามารถสัมผัส
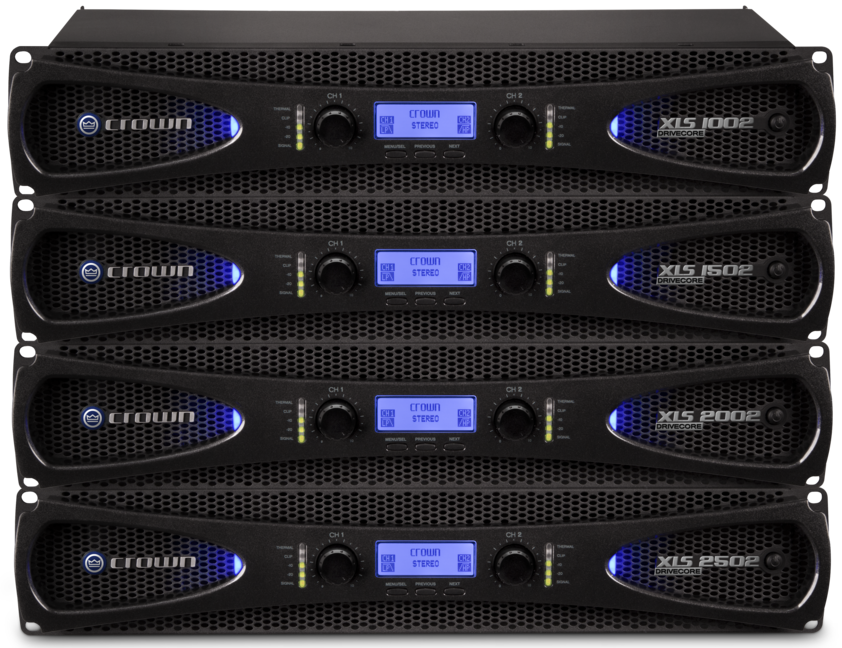
ประสบการณ์ใหม่ของ XLS DriveCare2 Series ที่มีให้เลือกถึง 4 รุ่น
เพาเวอร์แอมป์ Crown
Crown XLS DriveCore 2 Series Power Amplifiers
Front Panel Features
|
การระบายความร้อน
อากาศระบายความร้อนไหลเวียนจากด้านหน้าไปด้านหลัง |
LED แสดงสถานะ แสดงผล LED สีเขียวสองดวง ดวงละแชนนอนซ้ายขวาสำหรับสัญญาณแสดงสถานะ สัญญาณสูงกว่า -40dBu -20 ดวงLEDสีเขียวกะพริบเมื่อระดับสัญญาณเอาต์พุตเกินกว่า -20dB ใต้คลิป -10 ดวงLEDสีเขียวกะพริบเมื่อระดับสัญญาณเอาต์พุตเกินกว่า -10dB ใต้คลิป ตัวบ่งชี้การคลิป: ดวงLEDสองดวงสีแดงหนึ่งดวงสำหรับแต่ละช่องจะสว่างขึ้นเมื่อเอาต์พุตของช่องถูก overdriven ไฟแสดงสถานะความร้อน: ไฟ LED สีแดงสองดวงหนึ่งดวงสำหรับแต่ละช่องจะสว่างขึ้นเมื่อมีการเกิดความร้อนสูง |
LED สีน้ำเงิน: LED จะสว่างขึ้นเมื่อไฟเปิดหรือกะพริบขณะอยู่ในโหมดสลีป |
|||||||||||
 |
|||||||||||||
|
|||||||||||||
Crown XLS DriveCore 2 Series Power Amplifiers
Back Panel Features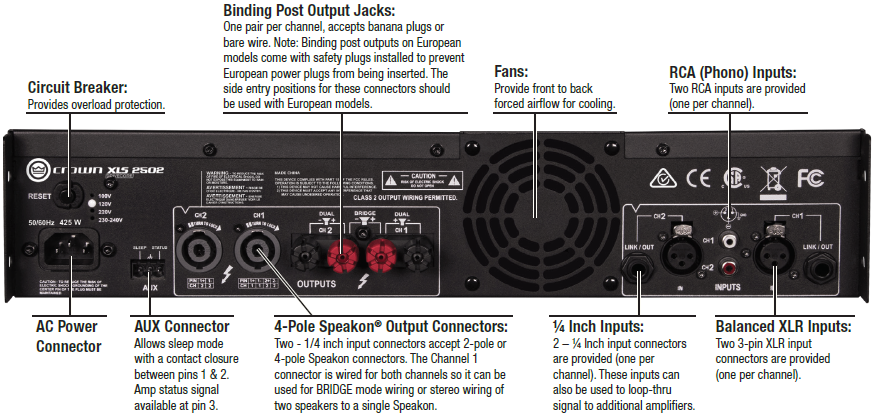
Crown XLS DriveCore 2 Series Power Amplifiers
|
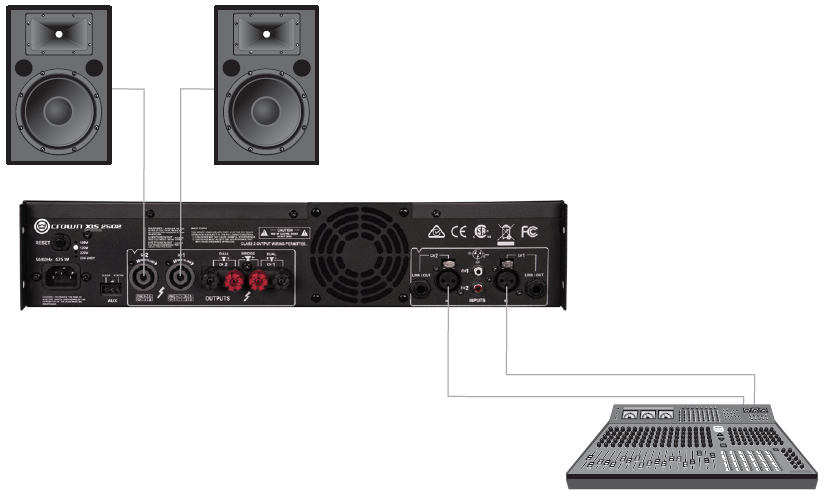
Get Started Stereo Mode This is the default mode the amplifier is set to from the factory. Filters are available in this mode and will be described in detail in the Crossover Filters section on page 9. 1. Connect Left/Right signal source to Channel 1 and Channel 2 using either the XLR, ¼ Inch, or RCA connectors. 2. Connect a speaker to each channel output using Speakon, Banana Plugs, or bare wire. |
 |
|
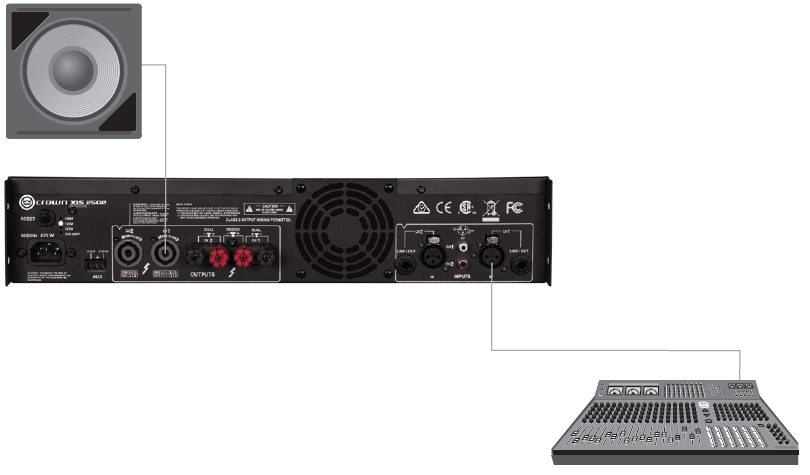
Bridge Mode BRIDGE mode delivers the power of both amp channels into a single load of 4Ω or greater. |
 |
| Crown XLS DriveCore 2 Series Power Amplifiers
Stereo Bi-Amp System |
|
Menu Navigation
Main Menu
Enter the MAIN MENU by holding the MENU/SEL button beneath the display for about a second. From the MAIN MENU one may navigate, using the PREVIOUS and NEXT buttons, to one of four other menus or select EXIT to return to the status screen where only three lines of text are displayed. Use the up arrow or down arrow to highlight the menu you wish to go to and press the MENU/SEL button to make your selection.
MAIN MENU
AMP MODE
CROSSOVER
INPUT SENSITIVITY
SYSTEM
EXIT
AMP MODE
The AMP MODE menu is used to select one of three amplifier modes available in your XLS amplifier. The factory default is set to STEREO mode. In STEREO mode, Channel 1 and Channel 2 both function as independent amplifiers. BRIDGE sets the outputs into a bridge configuration as described in the BRIDGE mode section. The INPUT-Y mode allows the user to drive fro m the two channels the same input signal This is convenient for setting up crossover filters for bi-amplified systems.
AMP MODE
STEREO
BRIDGE
INPUT-Y
BACK
Crossover
The CROSSOVER menu will allow the selection of filter type and filter frequency for each amplifier output channel. If the amplifier is in STEREO or INPUT-Y mode, you will first be prompted to select which amplifier channel to set up (BRIDGE mode skips this step). When you enter the CROSSOVER menu, the amplifier mode will be displayed.
CROSSOVER STEREO
CHANNEL 1
CHANNEL 2
BACK
Bridge Mode
Once you have selected the channel or if you are in BRIDGE mode, the available filter types will be displayed. Scroll to select between LOW PASS, BAND PASS or HIGH PASS filters, or select NO CROSSOVER. If a filter has been selected, the next screen will display the filter type and cut-off frequency. In the case of the BAND PASS filter, both the low and high cut-off frequencies will be displayed. Once you have selected the cut-off frequency or frequencies, you will be taken back to the MAIN MENU.
CROSSOVER CHANNEL 1
NO CROSSOVER
LOW PASS
BAND PASS
HIGH PASS
BACK
Input Sensitivity
The INPUT SENSITIVITY feature enables the playback from sources with inherently low output levels to drive the amplifier to full power by selecting ".775 - HIGH." It is recommended that this remain set at the default NORMAL setting for all other audio sources to provide optimal system performance. The HIGH setting is often used with source devices that use RCA connections.
INPUT SENSITIVITY
1.4V - NORMAL
.775V - HIGH
Additional Features
System Menu
The following features may be accessed through the SYSTEM MENU. The SYSTEM MENU is the fourth selection on the MAIN MENU. Since only three selections are displayed, you must scroll down using the NEXT button until SYSTEM is displayed and highlighted.
SYSTEM MENU
DISPLAY SLEEP
LIGHTING
SECURITY
INFORMATION
FACTORY RESET
BACK
Display Sleep
The user may configure the amplifier to allow the display to go into a sleep mode after a pre-determined idle time. This feature can be useful in applications where it is desirable to minimize the light from the amplifier.
This feature may be accessed via SYSTEM > DISPLAY SLEEP. Within the DISPLAY SLEEP menu, the user has the option to set the sleep mode to off or to choose a delay time of 30 seconds, 1 minute, 2 minutes or 5 minutes. If no menu buttons are pushed and the time period elapses, the display will turn off. It can be awakened by touching any menu button.
LED Lighting Options
LED lighting Options can be accessed via SYSTEM > LIGHTING. Inside the LIGHTING menu, the user can toggle the on and off of blue panel lights as well as the green signal level indicators.
Note: The thermal and clip indicators cannot be disabled.
Security
A security feature allows the user to lock the menu buttons so that the settings are not disturbed once they have been set up. To enable the security feature, go to SYSTEM > SECURITY and press NEXT to toggle the display to ENABLE. Press MENU/SEL to return to the SYSTEM MENU. Once enabled, the user can lock-out the menu buttons by simultaneously pressing the PREVIOUS and NEXT buttons. The menu will remain locked, even through a power cycle, until the PREVIOUS and NEXT buttons are pressed again.
System Information
For the audio geeks that just can't get enough data, we have provided a window to access your amplifier's system information. SYSTEM > INFORMATION will reveal a list of information including the model number, internal temperatures and voltages, firmware release number, etc.
Reset Factory Defaults
There may come a time when you just want to reset the entire system and start your setup from ground zero.If you are sure that you want to do this,
WARNING: If you reset your amplifier, all settings will revert to the factory preset values and you will lose all configurations you may have entered for amplifier modes, filter frequencies, input sensitivity and system settings.
| ราคา 17,900 บาท |

| ราคา 13,900 บาท |

| ราคา 110,000 บาท | |
| ราคา 0 บาท |

| ราคา 69,900 บาท | |
| ราคา 46,900 บาท |

| ราคา 16,900 บาท |

| ราคา 25,900 บาท |

| ราคา 39,900 บาท |

| ราคา 17,900 บาท |

| ราคา 57,900 บาท |

| ราคา 15,900 บาท |

| ราคา 21,900 บาท |

| ราคา 41,500 บาท |


